Jorge's Quest For Knowledge!

All About Identity And Security On-Premises And In The Cloud – It's Just Like An Addiction, The More You Have, The More You Want To Have!

Archive for the ‘Virtualization’ Category

(2014-02-07) Windows 8.1 Does Not Have Network Connectivity In VMware Workstation After Installation

Posted by Jorge on 2014-02-07


Today I was installing Windows 8.1 Pro in my test environment, which runs on VMware Workstation v9.x. The installation of Windows 8.1 Pro went quite smooth. However, right after the installation, to my surprise I did not have any network connectivity as you can see in figure 1.

image

Figure 1: No Network Connectivity In A Windows 8.1 Pro VM Running On VMware Workstation

I have installed WXP, W2K3(R2), WVT, Win7, W2K8(R2), Win8 and W2K12(R2) and none showed similar behavior. I have to admit I did not have the VMware Tools installed. However, after installing the VMware Tools I still did not have network connectivity. That’s weird. It has been years ago I had issues with VMware Workstation in combination with Windows.

You can read more about those issues in the following blog posts:

So, now back to this new issue…. Some details first. I installed this Windows 8.1 Pro VM:

  • In VMware Workstation v9.0.3 (It might occur in other version too!)
  • With VMware Workstation v8.x compatible hardware
  • I configured the guest VM as "Microsoft Windows 8" (REMARK: Only VMware Workstation v10.x officially support Windows 8.1 and Windows Server 2012 R2)

After installing the VMware Tools, the VM still did not have any network connectivity. Damn!

After comparing the VMX file (the file containing the VM config) one thing caught my attention when I compared it with another, but working, VM. See figure 2 below

image

Figure 2: No Network Connectivity In A Windows 8.1 Pro VM Running On VMware Workstation

For whatever reason the VMX file of the Windows 8.1 Pro VM was missing the following two lines (also highlighted in figure 2):

  • ethernet0.connectionType = "bridged"
  • ethernet0.virtualDev = "e1000"

Now the solution? Make sure the VM is shutdown, and not in a saved/resumed stated. Close VMware Workstation, edit the VMX file and add the two lines, if they are missing somehow. Save and close the VMX file. Open the Windows 8.1 VM again and start it up. Voila!

The result of these actions can be seen in figure 3 below

image

Figure 3: Network Connectivity Restored In The Windows 8.1 Pro VM Running On VMware Workstation

Awayyyyyy Silver! Smile

Cheers,
Jorge
———————————————————————————————
* This posting is provided "AS IS" with no warranties and confers no rights!
* Always evaluate/test yourself before using/implementing this!
* DISCLAIMER:
https://jorgequestforknowledge.wordpress.com/disclaimer/
———————————————————————————————
############### Jorge’s Quest For Knowledge #############
#########
http://JorgeQuestForKnowledge.wordpress.com/ ########
———————————————————————————————

Posted in Virtualization, Windows Client | Leave a Comment »

(2013-11-17) Time Sync Recommendations For Virtual DCs On Hyper-V – Change In Recommendations (AGAIN)

Posted by Jorge on 2013-11-17


The default time synchronization hierarchy within any AD forest is shown in the picture below.

image_thumb7

Figure 1: Default Time Synchronization Hierarchy Within Any AD Forest

As displayed in figure 1, DCs have their own time synchronization mechanism. When virtualizing DCs the time synchronization mechanism between the virtual DC (the VM guest) and the VM host must be disabled and it must be ensured the time synchronization mechanism natively used by the DCs is NOT disturbed. Reasoning for this is the high dependency that other processes (e.g. replication, authentication, etc.) have with accurate time.

OLD RECOMMENDATIONS:

  • Disable “Time Synchronization” within the Hyper-V Integration Services for each virtual DC VM (VM must be OFFLINE for this!)

image14

Figure 2: Hyper-V Time Synchronization Services In DISABLED State

  • Disable the “VM IC Time Provider” on every virtual DC through the registry or through a custom GPO setting
    • Key: HKLM\SYSTEM\CurrentControlSet\Services\W32Time\TimeProviders\VMICTimeProvider
    • Name: Enabled
    • Type: REG_DWORD
    • Data: 0x00000000

PREVIOUS RECOMMENDATIONS:

  • Leave “Time Synchronization” within the Hyper-V Integration Services ENABLED (DO NOT DISABLE!) for each virtual DC VM (VM must be OFFLINE for this!)
    REMARK: Microsoft documentation or other blogs may still advise in disabling time sync with the host. That information is incorrect! Leave it enabled!
  • Disable the “VM IC Time Provider” on every virtual DC through the registry or through a custom GPO setting
    • Key: HKLM\SYSTEM\CurrentControlSet\Services\W32Time\TimeProviders\VMICTimeProvider
    • Name: Enabled
    • Type: REG_DWORD
    • Data: 0x00000000

NEW RECOMMENDATIONS:

  • Disable “Time Synchronization” within the Hyper-V Integration Services for each virtual DC VM (VM must be OFFLINE for this!)

image14

Figure 3: Hyper-V Time Synchronization Services In DISABLED State

UPDATE (2013-12-14): make sure to have the following hotfix (KB2902014) if the Hyper-V host is running WIN8 or W2K12

Additional information about configuring Time Sync for DCs can be found through the following links:

Cheers,
Jorge
———————————————————————————————
* This posting is provided "AS IS" with no warranties and confers no rights!
* Always evaluate/test yourself before using/implementing this!
* DISCLAIMER:
https://jorgequestforknowledge.wordpress.com/disclaimer/
———————————————————————————————
############### Jorge’s Quest For Knowledge #############
#########
http://JorgeQuestForKnowledge.wordpress.com/ ########
———————————————————————————————

Posted in Active Directory Domain Services (ADDS), Core Networking Services, NTP, Virtualization | 6 Comments »

(2013-09-11) Follow-Up On “AD DB Becomes Corrupted When W2K12 Hyper-V Host Server Crashes”

Posted by Jorge on 2013-09-11


The guys from the AskPFE Team Blog have written a great follow-up article about the corruption of Active Directory databases in virtualized domain controllers running on Windows Server 2012 Hyper-V host computers. Kudos and credits of course go to the writer of the post on the AskPFE Team Blog. BE AWARE THAT THIS NOW ALSO APPLIES TO W2K8R2 HYPER-V HOSTS AND OTHER HYPER-V GUEST!

SOURCE: Clarifications on KB 2853952, Server 2012 and Active Directory error c00002e2 or c00002e3

<QUOTE SOURCE=”Clarifications on KB 2853952, Server 2012 and Active Directory error c00002e2 or c00002e3”>

Hey y’all, Mark and Tom here to clear up some confusion on MSKB 2853952, that describes the corruption of Active Directory databases in virtualized domain controllers running on Windows Server 2012 Hyper-V host computers.

The article was released in July 2013 with title “Active Directory database becomes corrupted when a Windows Server 2012-based Hyper-V host server crashes” but has sense since been renamed to “Loss of consistency with IDE-attached virtual hard disks when a Windows Server 2012-based Hyper-V host server experiences an unplanned restart” Confused already?  Please continue reading!!

The Problem

Following “hard” shutdowns (i.e. the plug is pulled) on Windows Server 2012  Hyper-V hosts, virtualized Domain Controller role computers may experience boot failures with error 2e2.

2e2 boot failures have occurred for years on DCs running on physical hardware when some specific guidelines (we’ll get to those in a minute) were not being followed. Deploying Active Directory – and therefore, AD databases, which are really just Jet databases, (as discussed in our AD Internals post) in a virtual environment introduces another additional root cause which is mitigated by MSKB 2853952.

The KB tells us that Jet databases placed on virtual IDE drives on virtual guests are vulnerable to corruption when the underlying Windows Server 2012 hyper-V host computer experiences an unplanned shutdown. Possible causes for such unscheduled shutdowns might include a loss of power to the data center or simply the intern tripping on the power cable in the data center. It has happened before and it will happen again.

Domain controller log files or database files that are damaged by an unscheduled shutdown may experience normal mode boot failures with a stop c00002e2 or c00002e3 error. If auto reboot is enabled on your domain controllers following a blue screen, DCs may continually reboot once their hyper-V host restarts.

Text and graphical examples of the c00002e2 are shown below

c00002e2 Directory Services could not start because of the following error: %hs Error Status: 0x%x. Please shutdown this system and reboot into Directory Services Restore Mode, check the event log for more detailed information.”

image

Figure 1: Uh oh…

The KB goes on to explain that this behavior occurs because the Hyper-V virtual IDE controller reports incorrectly “success” if the guest requests to disable the disk cache. Consequently, an application, like Active Directory, may think an I/O was written directly to disk, but was actually written to the disk cache. Since the power was lost, so was contents of the disk cache.

The Fix

There are four fundamental configuration changes to lessen the possibility from this occurring (whether DCs are deployed on physical or virtual machines):

  1. Make sure you are running on Server class hardware. That means that physical hard drives hosting Active Directory databases and other jet-dependent server roles (DHCP, FRS, WINS, etc) reside on SAS drives as opposed to IDE drives. IDE drives may not support forced unit access that is needed to ensure that critical writes by VM guests get transitively committed through the virtual hosts to underlying disk.
  2. Drive controllers should be configured with battery-backed caching controllers so that jet operations can be replayed when the hyper-V hosts and guests are restarted.
  3. If Hyper-V hosts can be configured with UPS devices so that both the host and the guest enjoy graceful shutdowns in the event of power losses, all the better.
  4. If you feel like the auto-reboot behavior masks the 2e2 or 2e3 boot errors, then disable the “automatically restart” option by going to the advanced tab on system properties under startup and recovery.

Next, MSKB 2853952 or the July 2013 cumulative rollup 2855336 (we’ve detailed these rollups in an earlier post) which includes standalone QFE 2853952 should be installed on Windows Server 2012 Hyper-V hosts and Windows Server 2012 guests.

A pending update, currently scheduled for release today (September 10th, 2013) will update 2853952 to apply to

  • Windows Server 2008 R2 Hyper-V hosts.
  • Windows 7 and Windows Server 2008 R2 virtual guests running on either Windows Server 2008 R2 or Windows Server 2012 Hyper-V hosts.

In summary, the updated version of KB 2853952 should be installed on both Windows Server 2008 R2 and Windows Server 2012 Hyper-V hosts (using the existing version of KB 2853952), and Windows 7 / Windows Server 2008 R2 virtual guests utilizing a jet-based store like Active Directory.

A workaround that can be deployed NOW, is to deploy jet databases, including the Active Directory  database and log files on virtual SCSI drives when Windows Server 2008 R2 and Windows Server 2012 virtual guests resides on Windows Server 2012 virtual hosts.

The reason SCSI or Virtual SCSI is recommended is that SCSI controllers will honor forced unit access or requests to disable write cache. Forced Unit Access (FUA) is a flag that NTFS uses to bypass the cache on the disk – essentially writing directly to the disk. SCSI has supported this via the t10 specification but this support was not available in the original t13 ATA specifications. While FUA support was added to the t13 ATA specifications after the original release, support for this has been inconsistent. More importantly, Windows does not support FUA on ATA drives.

Active Directory uses FUA to perform un-buffered writes to preserve the integrity of the database in the event of a power failure. AD will behave this way on physical and virtual platforms. If the underlying disk subsystem does not honor the FUA write, there could be database corruption and/or a “USN Bubble”. Further, some SCSI controllers feature a battery backed cache, just in case there are IOs still in memory when power is lost. (Thanks to fellow PFE Brent Caskey for doing some digging on this)

Applying the July update rollup and the pending September updates on the relevant Hyper-V hosts and virtual guests will greatly reduce the likelihood of damage to jet files when Hyper-V guests reside on virtual IDE disks. However the recommendation is still to use virtual SCSI disks for jet-based workloads and other critical data.

FAQ about this update

This update probably sent many of your admin spidey sense tingling and for good reason. Let’s try to answer ones that you are thinking about.

Does this only affect Active Directory?

By reading the actual problem you’ll notice it’s not a problem with Active Directory itself so the answer is no. The title of the KB has been updated to reflect this and hopefully provide some clarity. The problem is with applications that require I/O guarantee. IDE doesn’t provide I/O guarantee and neither does Virtual IDE.


How Should I Be Configured?

You are going to want to have your data stored on Virtual SCSI (vSCSI) disks for the reasons stated above.

What about physical machines on IDE drives, are they at risk too?

Yes. If you still have physical machines that are running on IDE drives, you will want to try to move the server data to SCSI disks as well.

I have all my data on the boot drive, can I boot off Virtual SCSI?

You cannot. In Server 2012 R2 we actually have Virtual SAS which you can use for both boot and data. For now you’ll need to use a separate virtual SCSI disk for data.

Is only Server 2012 affected by this?

No this also affects 2008 R2. However the new update is now for both 2008 R2 and 2012.

Where do I apply this update, host, guest or both?

The update should be applied to Windows Server 2012 hosts, and in a post July 2013 update, Windows Server 2008 R2 Hyper-V hosts, and Windows Server 2012/Windows Server 2008 R2 / Windows 7 virtual guests.

Anything else we should be doing for this?

You’ll want to make sure any operational and configuration changes are in place to avoid any unscheduled down time until you are able to move the data to a virtual SCSI disk and apply the appropriate updates.


I have a lot of DCs that are set up improperly, a little help?

Tom recently helped out a customer with moving their DB and logs to SCSI disks. Thanks to PowerShell and his powershell-fu, this is all pretty simple but it does take the AD service down on the target DC for a period of time.

First, on the Hyper-V host, you’ll need to attach a new disk to the virtual machine. Launch PowerShell as an admin on the host. Pre-identify the VM name and the physical location where you’ll create the new VHDX file.

Then run:

$vhd = New-VHD -Path [PATH TO VHDX] -SizeBytes 10GB -Dynamic:$false Add-VMHardDiskDrive -path $vhd.path -ControllerType:SCSI -ControllerNumber 0 -VMName [VMNAME]

Obviously, replace the bracketed parameters with your parameters. Also modify the disk size to something appropriate for your database. 10GB will cover most customers.

After, you need to log on to the guest VM to create the volume and move the DB. In the example below, we’ve used drive letter E. Modify this based on your company standards or configuration.

First, check to see if the disk is offline, and set it to online if it is.

Get-Disk | Where { $_.OperationalStatus -eq "Offline" } | Set-Disk -IsOffline:$false

Once it’s online, you just need to create the volume. PowerShell makes this very easy on Windows Server 2012. If you’re using 2008, you will need to replace this part with diskpart commands. For the sake of brevity, we’ll just cover PowerShell.

Get-Disk | Where { $_.PartitionStyle -eq "RAW" } | Initialize-Disk -PartitionStyle:GPT -PassThru | New-Partition -UseMaximumSize -DriveLetter E | Format-Volume -Full:$false -FileSystem:NTFS -NewFileSystemLabel "NTDS" -Force

Ok, that doesn’t look easy, but it’s all one line, making use of the PowerShell pipeline. As we complete each task, we pass the result to the next cmdlet. Finally, we end up with an E drive. Next, we need to move the database and logs. We’ll use ntdsutil to do this.

First, stop NTDS. Then, run ntdsutil. Modify the paths below to fit the drive letter you chose above.

#stop NTDS Stop-Service NTDS -Force #use NTDSutil to move logs/db ntdsutil activate instance ntds files move db to e:\NTDS move logs to e:\NTDS quit quit

Verify the output from ntdsutil. If you’re scripting this out, I recommend extensive testing ahead of time. You may be able to use Test-Path to figure out if the database and logs moved successfully or not. Assuming everything checked out, run Start-Service NTDS to restart NTDS. Congrats, you’re made it to SCSI disks.

Any questions please let us know in the comments.

Mark “Crash test dummy #1” Morowczynski and Tom “Crash test dummy #2” Moser

</QUOTE SOURCE=”Clarifications on KB 2853952, Server 2012 and Active Directory error c00002e2 or c00002e3”>

Cheers,

Jorge

———————————————————————————————

* This posting is provided "AS IS" with no warranties and confers no rights!

* Always evaluate/test yourself before using/implementing this!

* DISCLAIMER: https://jorgequestforknowledge.wordpress.com/disclaimer/

———————————————————————————————

############### Jorge’s Quest For Knowledge #############

######### http://JorgeQuestForKnowledge.wordpress.com/ ########

———————————————————————————————

Posted in Active Directory Domain Services (ADDS), Updates, Updates, Virtualization, Windows Client, Windows Server | Leave a Comment »

(2013-07-12) KB Article: AD DB Becomes Corrupted When W2K12 Hyper-V Host Server Crashes

Posted by Jorge on 2013-07-12


Active Directory database becomes corrupted when a Windows Server 2012-based Hyper-V host server crashes (KB2853952)

Cheers,
Jorge
———————————————————————————————
* This posting is provided "AS IS" with no warranties and confers no rights!
* Always evaluate/test yourself before using/implementing this!
* DISCLAIMER:
https://jorgequestforknowledge.wordpress.com/disclaimer/
———————————————————————————————
############### Jorge’s Quest For Knowledge #############
#########
http://JorgeQuestForKnowledge.wordpress.com/ ########
———————————————————————————————

Posted in Active Directory Domain Services (ADDS), KB Articles, Virtualization | 1 Comment »

(2012-10-09) Configuring A Network Switch In Windows Server 2008 R2 Hyper-V With PowerShell

Posted by Jorge on 2012-10-09


For a project at my customer I was creating a PowerShell script to fully automate the installation and configuration of Hyper-V that was going to be used for security sensitive virtual machines. One of the steps was configuring the network switches within Hyper-V. To achieve that I searched the internet for snippets that used native CMDlets.

This is how it looks like:

$localHyperVHostName = $ENV:COMPUTERNAME $virtualSwitchMgmtSvc = Get-WMIObject Msvm_VirtualSwitchManagementService -namespace "root\virtualization" -computername $localHyperVHostName $physicalNetworkAdapters = Get-WMIObject Msvm_ExternalEthernetPort -namespace "root\virtualization" -computername $localHyperVHostName | ?{$_.IsBound -eq $False -And $_.EnabledState -eq "2"} $ExternalEthernetPortNameVMsLAN = Get-WMIObject win32_networkadapter | ?{$_.NetConnectionID -eq "VMs LAN"} | %{$_.Name} $ExternalEthernetPortVMsLAN = $physicalNetworkAdapters | ?{$_.Name -eq $ExternalEthernetPortNameVMsLAN} $InternalEthernetPortFriendlyNameVMsLAN = "VM Guests Network" $InternalSwitchPortFriendlyName = "InternalSwitchPort" $ExternalSwitchPortFriendlyName = "ExternalSwitchPort" $switchGuidVMsLAN = [guid]::NewGuid().ToString() $InternalSwitchPortGuidVMsLAN = [guid]::NewGuid().ToString() $ExternalSwitchPortGuidVMsLAN = [guid]::NewGuid().ToString() $InternalEthernetPortGuidVMsLAN = [guid]::NewGuid().ToString() $resultCreateSwitchVMsLAN = $virtualSwitchMgmtSvc.CreateSwitch($switchGuidVMsLAN, $InternalEthernetPortFriendlyNameVMsLAN, "1024", $null) $switchVMsLAN = $resultCreateSwitchVMsLAN.CreatedVirtualSwitch $resultCreateInternalSwitchPortVMsLAN = $virtualSwitchMgmtSvc.CreateSwitchPort($switchVMsLAN, $InternalSwitchPortGuidVMsLAN, $InternalSwitchPortFriendlyName, $null) $switchPortInternalVMsLAN = $resultCreateInternalSwitchPortVMsLAN.CreatedSwitchPort $resultCreateExternalSwitchPortVMsLAN = $virtualSwitchMgmtSvc.CreateSwitchPort($switchVMsLAN, $ExternalSwitchPortGuidVMsLAN, $ExternalSwitchPortFriendlyName, $null) $switchPortExternalVMsLAN = $resultCreateExternalSwitchPortVMsLAN.CreatedSwitchPort $resultSetupSwitchVMsLAN = $virtualSwitchMgmtSvc.SetupSwitch($switchPortExternalVMsLAN, $switchPortInternalVMsLAN, $ExternalEthernetPortVMsLAN, $InternalEthernetPortGuidVMsLAN, $InternalEthernetPortFriendlyNameVMsLAN) Start-Sleep -s 30 # This is needed to that Hyper-V has the time to finish the creation of the switch $InternalEthernetPortVMsLAN = Get-WMIObject Msvm_InternalEthernetPort -namespace "root\virtualization" -computername $localHyperVHostName | ?{$_.ElementName -eq $InternalEthernetPortFriendlyNameVMsLAN} $virtualSwitchMgmtSvc.DeleteInternalEthernetPort($InternalEthernetPortVMsLAN) | Out-Null

After being almost finished, I found the Hyper-V PoSH module on Codeplex created by a few Microsoft engineers. I also decided to achieve the same result, but instead using these new CMDlets.

This is how it looks like:

Import-Module HYPERV $localHyperVHostName = $ENV:COMPUTERNAME $SwitchNameVMsLAN = "VM Guests Network" $nicVMsLAN = Get-WMIObject win32_networkadapter | ?{$_.NetConnectionID -eq "VMs LAN"} | %{$_.Name} New-VMExternalSwitch -VirtualSwitchName $SwitchNameVMsLAN -ExternalEthernet $nicVMsLAN -Server $localHyperVHostName -Force Remove-VMSwitchNIC $SwitchNameVMsLAN -Server $localHyperVHostName -Force

See the difference? That just rocks!

I decided to continue and use the Hyper-V PoSH module as that was why easier to get stuff done!

By the way, if you want to install the Hyper-V PoSH module, don’t use the installation steps provided, but rather extract the ZIP file and move the HYPERV folder and its contents to the “C:\Windows\system32\WindowsPowerShell\v1.0\Modules\” folder.

Cheers,

Jorge

———————————————————————————————

* This posting is provided "AS IS" with no warranties and confers no rights!

* Always evaluate/test yourself before using/implementing this!

* DISCLAIMER: https://jorgequestforknowledge.wordpress.com/disclaimer/

———————————————————————————————

############### Jorge’s Quest For Knowledge #############

######### http://JorgeQuestForKnowledge.wordpress.com/ ########

———————————————————————————————

Posted in PowerShell, Virtualization | Leave a Comment »

(2012-05-26) Using Both Microsoft Hyper-V And VMware Workstation On The Same Machine

Posted by Jorge on 2012-05-26


I have been using VMware workstation since the beginning of time, well almost then! Smile. Yes, I’m a huge Vmware workstation fan because it gives me all the flexibility I need on my work laptop to give demos, perform tests, etc. Features I really like are: USB support, network redirector to access data on the host without IP connectivity, copy paste to/from VM from/to host, easiness to copy/distribute VMs between VMware workstation instances, and some more.

However, sometimes I also need to use Hyper-V. Previous I was only able to use Hyper-V on Windows Server and because I did not feel like using Windows Server as my desktop OS I always needed additional hardware. What I DO NOT mean is to use both Hyper-V and VMware workstation at the same time. I DO mean that I want to use either one at a time when I need to.

However, now with Windows 8, BOTH the desktop and server OS have Hyper-V as OS feature/role. That’s good news! BUT….how to get both Hyper-V and VMware workstation on the same machine without wither complaining. Until now I have not found anything on how to do this, until a person in the VMware forums (this post) pointed me to a link explaining the steps to achieve what I have wanted for ages! Read it here.

The first thing you need to determine is which virtualization technology will be used very frequent and which virtualization technology will be used sporadically. In my personal case VMware workstation will be used very frequent, and is therefore the default, and Hyper-V only as needed. As my desktop OS I’m using Windows 8 client.

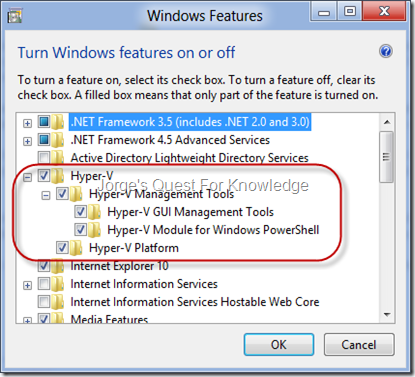
After installing Windows 8, go to the Control Panel (lower right corner of the desktop –> Settings –> Control Panel) –> Programs And Features –> Turn Windows Features On Or Off. Then make sure all Hyper-V components are checked as shown below. Then click “OK”. Close all windows when done.

image

Figure 1: Installing The Hyper-V Windows Feature On Windows 8 (Client)

Hyper-V is now installed and now it is time to install VMware Workstation. The latter won’t even install if it detects Hyper-V is installed AND running. In other words, Hyper-V is already claiming the Hypervisor and because of that VMware workstation can’t use it.

Make sure the following is done with admin credentials AND elevated! Open a command prompt window by pressing [WINDOWS KEY]+[R] and then type CMD.

Then type: BCDEDIT /ENUM

image

Figure 2: Enumerating The Boot Options In The Boot Menu (After Installing Hyper-V)

Check out the last element called “hypervisorlaunchtype”.

Now Type: BCDEDIT /COPY {DEFAULT} /D “No Windows Hypervisor”

image

Figure 3: Creating A Copy Of The Original Boot Option

Note the GUID that is mentioned at the end between brackets. Now for the just create copy of the original boot option you will disable the automatic claim/use of the hypervisor by Hyper-V.

Now type: BCDEDIT /SET {d9cbf0e2-786c-11e1-b1f9-abcdd5349459} HYPERVISORLAUNCHTYPE OFF

image

Figure 4: Disabling Hyper-V To Claim/Use The Hypervisor In The Copy Of The Original Boot Option

Now type: BCDEDIT /ENUM /V

image

Figure 5: Enumerating The Boot Options In The Boot Menu

Currently, the boot option  with the description “Windows 8 Consumer Preview” is set as the default, and that’s the boot option I need to select when I want to use Hyper-V. However, when I want to use VMware Workstation I need to select the boot option with the description “No Windows Hypervisor” and I use VMware Workstation as my default virtualization solution I need to set the corresponding boot option as the default choice.

Now type: BCDEDIT /DEFAULT {d9cbf0e2-786c-11e1-b1f9-abcdd5349459}

image

Figure 6: Setting The Copy Of The Original Boot Option

Now type: BCDEDIT /ENUM /V

image

Figure 7: Enumerating The Boot Options In The Boot Menu

Now when you reboot Windows 8, you will see something similar like…

image

Figure 8: Choosing A Boot Option During The Booting Of The OS

If you do not choose an option it will by default continue with the default option and in this that will be “No Windows Hypervisor” boot option.

If you do make a choice and choose the boot option called “No Windows Hypervisor” you will be able to use VMware Workstation, but you will not be able to use Hyper-V.

If you do make a choice and choose the boot option called “Windows 8 Consumer Preview” you will be able to use Hyper-V, but you will not be able to use VMware Workstation. In this case the OS would reboot again and allow you to start Hyper-V afterwards.

Remember, you can only have ONE virtualization technology running at a time! If you want to switch between using a virtualization technology, you will need to reboot the computer again!

Have fun!

I have been using this for a few weeks now, and this is quite cool and now I’m happy as I can use both without having additional hardware!

PS: Although I have not tested it, this will also work with W2K8 and W2K8R2.

Cheers,
Jorge
———————————————————————————————
* This posting is provided "AS IS" with no warranties and confers no rights!
* Always evaluate/test yourself before using/implementing this!
* DISCLAIMER:
https://jorgequestforknowledge.wordpress.com/disclaimer/
———————————————————————————————
############### Jorge’s Quest For Knowledge #############
#########
http://JorgeQuestForKnowledge.wordpress.com/ ########
———————————————————————————————

Posted in Virtualization | 8 Comments »

(2011-09-26) Windows (Server) 8 Developer Preview And VMware Workstation

Posted by Jorge on 2011-09-26


If you want to try out Windows (Server) 8 Developer Preview and you are a VMware Workstation fan, like me, then you need at least VMware Workstation 8. VMware Workstation 8 does not list Windows (Server) 8 as an OS, but it works when you respectively specify Windows 7 or Windows Server 2008 R2 as the VM guest OS. With lower versions of VMware Workstation (lower then v8.x) as soon as you start the Windows (Server) 8 VM guest, VMware Workstation throws an error. With VMware Workstation 8 that does not happen/occur.

However, with VMware Workstation 8, as soon as you install the VMware Tools the screen of the VM guest turns black at some point in time and I have not been able to solve it. After a reboot, the screen of the VM guest still remains black. To still be able to install VMware Tools without the screen of the VM guest turning black, you should choose “Custom Install” (instead of “Typical Install” or “Full Install”) and deselect the display driver. After that everything should be OK.

Cheers,
Jorge
———————————————————————————————
* This posting is provided "AS IS" with no warranties and confers no rights!
* Always evaluate/test yourself before using/implementing this!
* DISCLAIMER:
https://jorgequestforknowledge.wordpress.com/disclaimer/
———————————————————————————————
############### Jorge’s Quest For Knowledge #############
#########
http://JorgeQuestForKnowledge.wordpress.com/ ########
———————————————————————————————

Posted in Beta/RC Stuff, Virtualization, Windows Client, Windows Server | 2 Comments »

(2011-09-14) Time Sync Recommendations For Virtual DCs On Hyper-V – Change In Recommendations

Posted by Jorge on 2011-09-14


UPDATED: (2013-11-17) Time Sync Recommendations For Virtual DCs On Hyper-V – Change In Recommendations (AGAIN)

The time synchronization hierarchy within any AD forest is shown in the picture below.

image

Figure 1: Default Time Synchronization Hierarchy Within Any AD Forest

As displayed in figure 1, DCs have their own time synchronization mechanism. When virtualizing DCs the time synchronization mechanism between the virtual DC (the VM guest) and the VM host must be disabled and it must be ensured the time synchronization mechanism natively used by the DCs is NOT disturbed. Reasoning for this is the high dependency that other processes (e.g. replication, authentication, etc.) have with accurate time.

PREVIOUS RECOMMENDATIONS:

  • Disable “Time Synchronization” within the Hyper-V Integration Services for each virtual DC VM (VM must be OFFLINE for this!)

image

Figure 2: Hyper-V Time Synchronization Services In DISABLED State

  • Disable the “VM IC Time Provider” on every virtual DC through the registry or through a custom GPO setting
    • Key: HKLM\SYSTEM\CurrentControlSet\Services\W32Time\TimeProviders\VMICTimeProvider
    • Name: Enabled
    • Type: REG_DWORD
    • Data: 0x00000000

NEW RECOMMENDATIONS:

  • Leave “Time Synchronization” within the Hyper-V Integration Services ENABLED (DO NOT DISABLE!) for each virtual DC VM (VM must be OFFLINE for this!)
    REMARK: Microsoft documentation or other blogs may still advise in disabling time sync with the host. That information is incorrect! Leave it enabled!
  • Disable the “VM IC Time Provider” on every virtual DC through the registry or through a custom GPO setting
    • Key: HKLM\SYSTEM\CurrentControlSet\Services\W32Time\TimeProviders\VMICTimeProvider
    • Name: Enabled
    • Type: REG_DWORD
    • Data: 0x00000000

Additional information about configuring Time Sync for DCs can be found through the following links:

Cheers,
Jorge
———————————————————————————————
* This posting is provided "AS IS" with no warranties and confers no rights!
* Always evaluate/test yourself before using/implementing this!
* DISCLAIMER:
https://jorgequestforknowledge.wordpress.com/disclaimer/
———————————————————————————————
############### Jorge’s Quest For Knowledge #############
#########
http://JorgeQuestForKnowledge.wordpress.com/ ########
———————————————————————————————

Posted in Active Directory Domain Services (ADDS), NTP, Virtualization | 4 Comments »

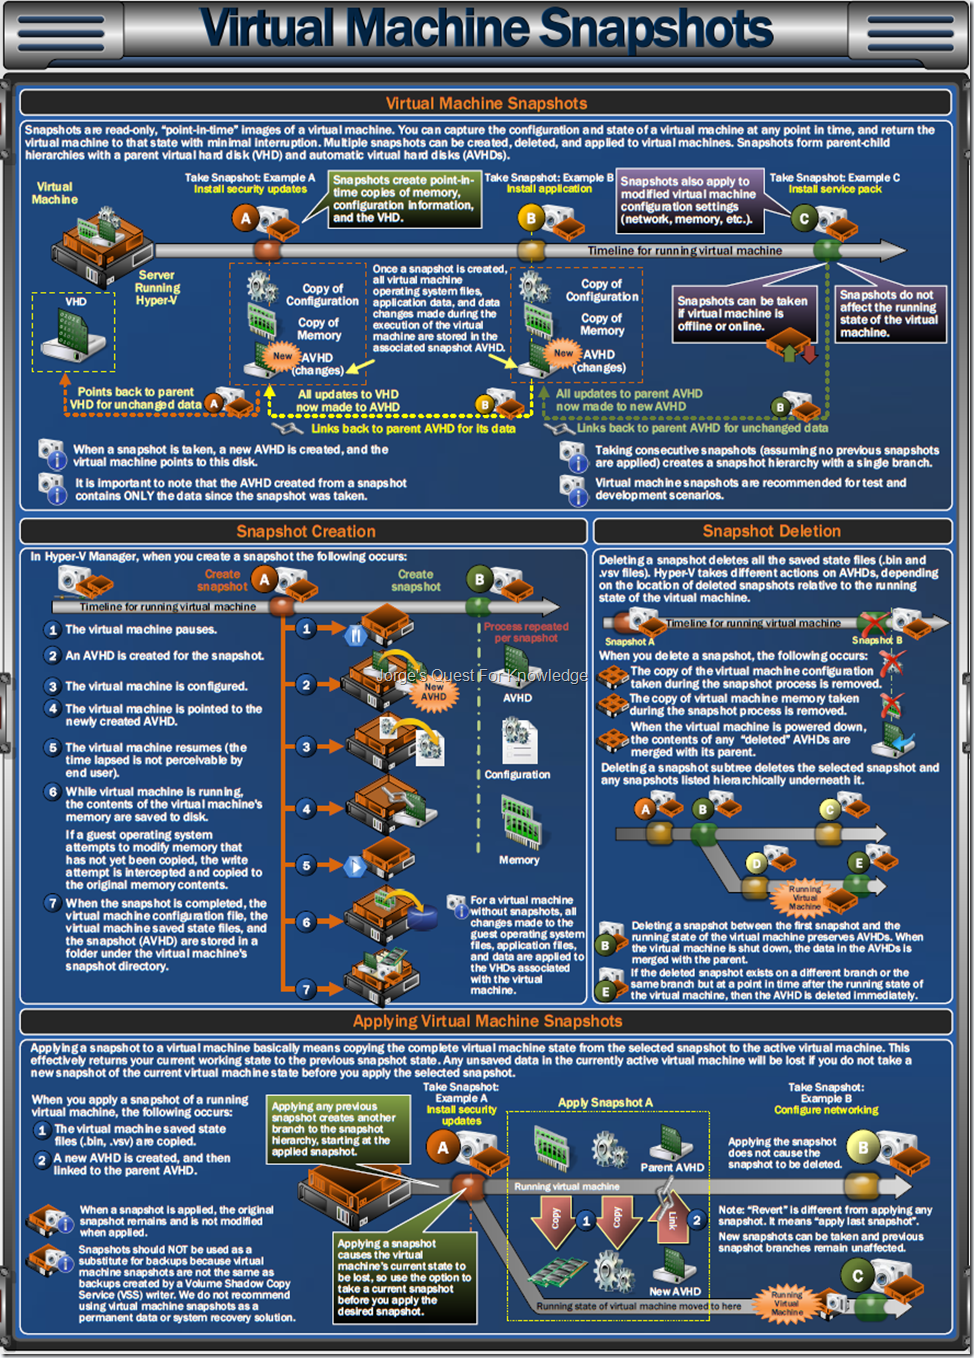
(2010-10-28) Component Poster: "Windows Server 2008 R2 Hyper-V"

Posted by Jorge on 2010-10-28


Get the PDF from here: Windows Server 2008 R2 Hyper-V Component Architecture

clip_image001

clip_image002

clip_image003

clip_image004

clip_image005

clip_image006

clip_image007

clip_image008

Cheers,
Jorge
———————————————————————————————
* This posting is provided "AS IS" with no warranties and confers no rights!
* Always evaluate/test yourself before using/implementing this!
* DISCLAIMER:
https://jorgequestforknowledge.wordpress.com/disclaimer/
———————————————————————————————
############### Jorge’s Quest For Knowledge #############
#########
http://JorgeQuestForKnowledge.wordpress.com/ ########
———————————————————————————————

Posted in Virtualization, Windows Server | Leave a Comment »

(2010-05-18) Boot From USB In VMware Workstation

Posted by Jorge on 2010-05-18


For years I have been using VMware Workstation as the desktop virtualization for all my demoing, testing and learning needs. It fulfills all the needs I have with regards to flexibly using virtualization technology in the broadest sense. I have always tried to find the barriers of the product and I was able to do really a lot with it. One thing that has not been possible with VMware Workstation (even in the latest available version) is booting from USB. The VMware BIOS does not provide an option to boot from external media.

With something I found recently, you only need to be able to boot from CD/DVD and the ability to load an ISO file OR be able to boot from Floppy and the ability to load an IMG file.

The tool I use is called "PLoP Boot Manager" and it can be downloaded from here.

After configuring the BIOS to boot either from Floppy or CD/DVD you need to load the IMG or ISO file (depending on what you used to boot). After doing this you will see a screen similar to the following.

image

As you can see, it list all kinds of options to boot from. In the case you see above it list the 4 partitions my VM has. The OS is installed on Partition2 so only that partition would be bootable at the time. But, again as you see it lists also other options to boot from, including USB.

As soon as you select an option and hit ENTER, it will hand over the boot process to the option selected. This works perfectly! Try it yourself.

I have not tested this with other virtualization technologies (e.g. Hyper-V or ESX), but I expect it is also possible to use the same way I described above.

Cheers,
Jorge
———————————————————————————————
* This posting is provided "AS IS" with no warranties and confers no rights!
* Always evaluate/test yourself before using/implementing this!
* DISCLAIMER:
https://jorgequestforknowledge.wordpress.com/disclaimer/
———————————————————————————————
############### Jorge’s Quest For Knowledge #############
#########
http://JorgeQuestForKnowledge.wordpress.com/ ########
———————————————————————————————

Posted in Tooling/Scripting, Virtualization | 1 Comment »