With this post I want to show you the ADFS v2.0 PRX installation procedure that I used in my test/demo environment. The installation binaries can be downloaded from the internet for W2K8/W2K8R2 from here, and I also downloaded (at the time of writing) the latest update rollup for ADFS from here. I followed the following installation steps.
After downloading the ADFS installation binaries, double-click it. Then click on “Next >”.
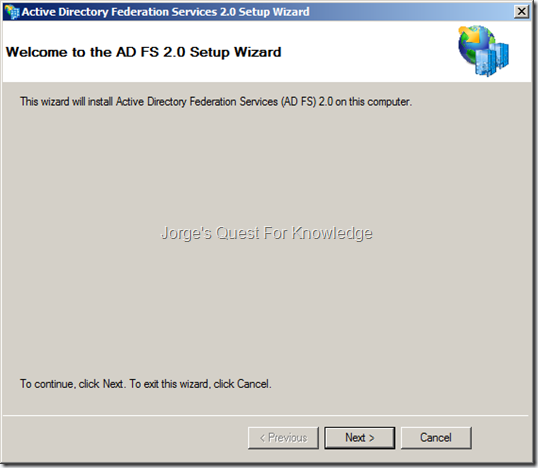
Figure 1: The Active Directory Federation Services v2.0 Setup Wizard
–
Check the “I accept the terms in the License Agreement” after reading and accepting the EULA for ADFS v2.0, and then click on “Next >”.

Figure 2: The Active Directory Federation Services v2.0 Setup Wizard – The EULA
–
We need to start with the installation of the federation proxy server. In terms of locating and securing the PRX server, you do not need to consider it as an ADFS STS server. The purpose of the ADFS PRX is to locate it on insecure networks or locate it facing insecure networks (e.g. internet). The ADFS PRX is basically a traffic agent without any authority. It just passes security tokens from the ADFS STS to the user and vice versa and allows the automatic exchange of metadata to occur when possible. The ADFS PRX server is not able/allowed to generate any security token with any claim like an ADFS STS server. Therefore, anyone in control of the PRX server is not able to do anything.
The ADFS PRX server does not need to be domain joined, but it could be if you want to leverage centralized administration and policy management through AD.
–
Because we need an PRX server, select the federation proxy server option.

Figure 3: The Active Directory Federation Services v2.0 Setup Wizard – Installing An PRX Server
–
Click on “Next >”.

Figure 4: The Active Directory Federation Services v2.0 Setup Wizard – Prerequisite Software
–
Now, just be patient.

Figure 5: The Active Directory Federation Services v2.0 Setup Wizard – Installation Of Binaries In Progress
–
Make sure to have the option “Start the AD FS 2.0 Federation Server Proxy Configuration Wizard when this wizard closes” checked and click on “Finish”.

Figure 6: The Active Directory Federation Services v2.0 Setup Wizard – Installation Finished
–
If IIS was not pre-installed and/or if the default website was not already configured with a SSL certificate, the following error will appear. Read it carefully and click on “OK”. It is recommended to FIRST get a certificate and then connect the ADFS PRX server to the ADFS STS server(s).

Figure 7: Error When SSL Has Not Been Configured On The Default Website
–
If the ADFS PRX server is domain joined, you can request an SSL certificate using the next steps. If the ADFS PRX server is operating as non-domain joined. You will need to do an offline certificate request and then manually deploy it to ADFS PRX server(s).
For now I’m assuming it is domain joined as that is easier to describe! 
–
For more information about the certificates in use by ADFS see:
–
In this case I’m going to use certificate from the CA in my test/demo environment.
–
Start the Certificates MMC on the ADFS PRX server and target the local computer. To request a certificate navigate to “Certificates (Local Computer)” –> Personal –> Certificates. Right-click the last one and then “All Tasks” –> “Request New Certificate”.

Figure 8: Requesting A New Certificate
–
Click on “Next >”.

Figure 9: Certificate Enrollment – Before You Begin
–
In this select the “Active Directory Enrollment Policy” and click on “Next”.

Figure 10: Certificate Enrollment – Certificate Enrollment Policy
–
For this certificate you can leverage the “Web Server” certificate template. Select the “Web Server” certificate template, click on details to expand for more information and click on “Properties”.

Figure 11: Selecting The “Web Server” Certificate Template
–
For the Service Communication (SSL) Certificate, targeting the “Subject” TAB, provide the service name (e.g. FS.ADCORP.LAB) as the subject name (Type = Common Name) and as the alternate name (Type = DNS). The ADFS PRX server must also be reachable using the ADFS federation service name (e.g. FS.ADCORP.LAB). In addition to that, the ADFS PRX server itself must be able to access the ADFS STS server(s) using the exact same ADFS federation service name (e.g. FS.ADCORP.LAB). How you achieve that really depends on the DNS name resolution setup internally, in the DMZ and on the internet. But, that’s a totally different story I hope to describe another day. Unfortunately, today is not that day.

Figure 12a: Service Communication (SSL) Certificate – Subject Name And Alternate Name
–
For the Service Communication (SSL) Certificate, targeting the “General” TAB, provide the friendly name (e.g. Service Communication Cert For ADFS-PRX) and the description.

Figure 12b: Service Communication (SSL) Certificate – Friendly Name And Description
–
For the Service Communication (SSL) Certificate, targeting the “Private Key” TAB, configure the private key to be exportable. Click “OK” when done.

Figure 12c: Service Communication (SSL) Certificate – Configuring Private Key To Be Exportable
–
Click on “Enroll” to actually enroll the certificate.

Figure 13: Enrolling The Certificate
–
Click on “Finish”
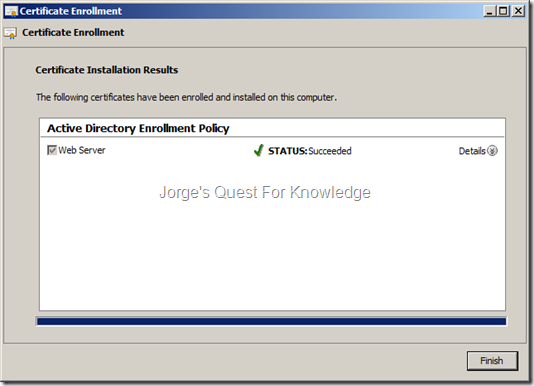
Figure 14: Finishing The Certificate Enrollment
–
Now by using the IIS MMC you need to make sure the default website has an HTTPS (SSL) binding (port 443) and also uses the just enrolled SSL certificate.

Figure 15: HTTPS (Port 443) Binding Using The Service Communication Certificate For The ADFS-PRX
–
Also make sure to enforce SSL as shown in the picture below.

Figure 16: Enforcing The Use Of SSL For The Default Website
–
Now from the Start Menu, start the AD FS 2.0 Federation Server Proxy Configuration Wizard and then click on “Next >”.

Figure 17: The Active Directory Federation Server Proxy Configuration Wizard
–
Type the federation service name (e.g. FS.ADCORP.LAB) that was also used when installing the ADFS STS servers

Figure 18: Specifying The Federation Service Name
–
To make sure you can connect the ADFS PRX server to the ADFS STS server(s), you should first test the connection by clicking on “Test Connection”. If the connection if successful you will see the acknowledgement an then click on “OK”. If not, you will receive an error. Click on “Next >”.

Figure 19: Testing The Connection From The ADFS PRX Server To The ADFS STS Server (s)
–
To actually connect the ADFS PRX to the ADFS STS servers, you need to provide credentials. Those credentials can either be the credentials for the ADFS service account used on the ADFS STS servers, or be any account that has local administrative permissions on the ADFS STS server(s). Therefore, enter credentials and click on “OK”.

Figure 20: Specifying The Credentials To Connect The ADFS PRX Server To The ADFS STS Server(s)
–
When successful, the following will appear. Click on “Next >” to configure the local ADFS PRX server.
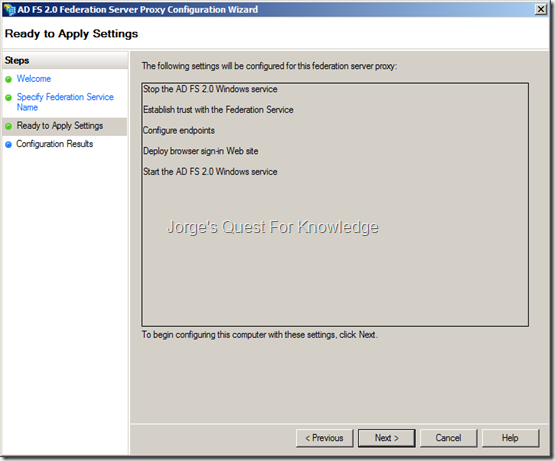
Figure 21: Configuration Summary Of The Local ADFS PRX Server
–
The ADFS PRX is being configured. Be patient.

Figure 22: Actual Configuration Of The Local ADFS PRX Server
–
When the actual configuration is done, click on “Close”.

Figure 23: The Configuration Of The Local ADFS PRX Server Finished
–
Now it is time to update the ADFS role. After downloading the ADFS rollup package, extract it and double-click the MSU file. Then click “YES”.
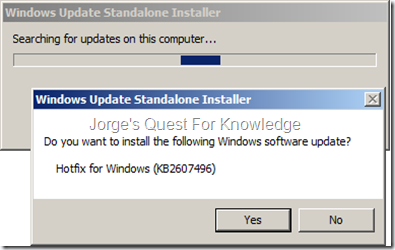
Figure 24: Confirming The Installation Of The ADFS Rollup Package 1
–
Click on “Restart Now” to restart the server.

Figure 25: Finalizing The Installation Of The ADFS Rollup Package
–
To validate the working of your ADFS deployment, you can target the following URLs (of course replace this with your own federation service name!!!):
- https://fs.adcorp.lab/adfs/ls/IdPInitiatedSignOn.aspx
- https://fs.adcorp.lab/FederationMetadata/2007-06/FederationMetadata.xml
–
[1] –> https://fs.adcorp.lab/adfs/ls/IdPInitiatedSignOn.aspx
First it will perform Home Realm Discovery (HRD) if you have more than one Claims Provider Trust configured. I this case I do, so that’s why it happened.
![image_thumb[1] image_thumb[1]](https://jorgequestforknowledge.files.wordpress.com/2012/08/image_thumb1_thumb2.png?w=536&h=454)
Figure 26: Testing ADFS Deployment – Home Realm Discovery
–
As soon as you click on “continue to sign in” it will ask you to provide credentials. This does assume you are not using Windows Integrated Authentication (in that case the federation service FQDN is NOT added to the Local Intranet Zone in IE). The collection of the credentials is either Windows based of forms based, whatever you have configured. On a ADFS STS it most likely is Windows based as that is the default! If you want to use Windows Integrated Authentication you must add the federation service FQDN to the Local Intranet Zone in IE. On a PRX forms based is the default
![image_thumb[3] image_thumb[3]](https://jorgequestforknowledge.files.wordpress.com/2012/08/image_thumb3_thumb.png?w=536&h=454)
Figure 27: Testing ADFS Deployment – Providing Credentials
–
![image_thumb[5] image_thumb[5]](https://jorgequestforknowledge.files.wordpress.com/2012/08/image_thumb5_thumb1.png?w=537&h=455)
Figure 28: Testing ADFS Deployment – Successful Logon
–
[2] –> https://fs.adcorp.lab/FederationMetadata/2007-06/FederationMetadata.xml
As soon as you enter the URL and hit ENTER, you might end up in seeing a BLANK page. To actually see the federation metadata, click IN ADDITION on the “Compatibility View” button in IE. You will then see the following.
![image_thumb[9] image_thumb[9]](https://jorgequestforknowledge.files.wordpress.com/2012/08/image_thumb9_thumb.png?w=533&h=434)
Figure 29: Testing ADFS Deployment – Federation Metadata
–
With regards to ADFS, also see the following resource with lots of information:
–
ADFS Related Videos:
–
Cheers,
Jorge
———————————————————————————————
* This posting is provided "AS IS" with no warranties and confers no rights!
* Always evaluate/test yourself before using/implementing this!
* DISCLAIMER: https://jorgequestforknowledge.wordpress.com/disclaimer/
———————————————————————————————
############### Jorge’s Quest For Knowledge #############
######### http://JorgeQuestForKnowledge.wordpress.com/ ########
———————————————————————————————








![image_thumb[1] image_thumb[1]](https://jorgequestforknowledge.files.wordpress.com/2012/08/image_thumb1_thumb2.png?w=536&h=454)
![image_thumb[3] image_thumb[3]](https://jorgequestforknowledge.files.wordpress.com/2012/08/image_thumb3_thumb.png?w=536&h=454)
![image_thumb[5] image_thumb[5]](https://jorgequestforknowledge.files.wordpress.com/2012/08/image_thumb5_thumb1.png?w=537&h=455)
![image_thumb[9] image_thumb[9]](https://jorgequestforknowledge.files.wordpress.com/2012/08/image_thumb9_thumb.png?w=533&h=434)