You are using ADFS v3.0, or higher, in combination with the Web Application Proxy (WAP) to publish internal applications to the outside. Some of those applications are published with “pre-authentication” and some of those applications are published with “pass-through”.
On a device that is on the outside of your network, in a browser you enter the URL of an application that is published through the WAP with ADFS pre-authentication. The issue I’m about to explain DOES NOT occur with applications published through the WAP with pass-through.
Most likely you will hit a similar screen as the one below that is asking for Forms Based Authentication (FBA).
Figure 1: The ADFS Forms Based Authentication Screen
–
After entering the credentials you are redirected back to the application, and you end up stuck in an empty screen. When you look up at the URL, you may see something like “authToken=”.
Figure 2: After Being Redirected To The Application An Empty Screen
–
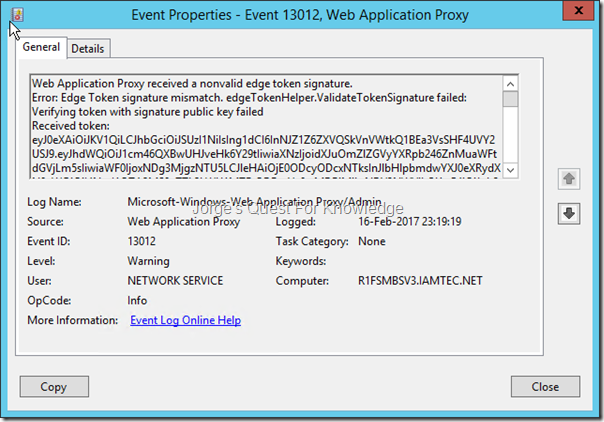
When looking in the Web Application Proxy Event Log you may find a similar event as the one below, telling you the Edge Token signing is not correct.
Figure 3: Event About An Invalid Edge Token
–
Web Application Proxy received a nonvalid edge token signature.
Error: Edge Token signature mismatch. edgeTokenHelper.ValidateTokenSignature failed: Verifying token with signature public key failed
Received token: eyJ0eXAiOiJKV1QiLCJhbGciOiJSUzI1NiIsIng1dCI6InNJZ1Z6ZXVQSkVnVWtkQ1BEa3VsSHF4UVY2USJ9.eyJhdWQiOiJ1cm46QXBwUHJveHk6Y29tIiwiaXNzIjoidXJuOmZlZGVyYXRpb246ZnMuaWFtdGVjLm5sIiwiaWF0IjoxNDg3MjgzNTU5LCJleHAiOjE0ODcyODcxNTksInJlbHlpbmdwYXJ0eXRydXN0aWQiOiI4NmI1OTA2MS0yZTk2LWU1MTEtODBmYy0wMDBjMjkxNDY3NWYiLCJ1cG4iOiJqb3JnZUBpYW10ZWMubmwiLCJjbGllbnRyZXFpZCI6IjM0MTljNjA4LTg4OTQtMDAwMC0zZmM3LTE5MzQ5NDg4ZDIwMSIsImF1dGhtZXRob2QiOiJ1cm46b2FzaXM6bmFtZXM6dGM6U0FNTDoyLjA6YWM6Y2xhc3NlczpQYXNzd29yZFByb3RlY3RlZFRyYW5zcG9ydCIsImF1dGhfdGltZSI6IjIwMTctMDItMTZUMjI6MTk6MTguMTIyWiIsInZlciI6IjEuMCJ9.L_dnLDoEQ6U8ViJ9XWBEMdagj4QsUV4emvtHiX4dik3vos3tWN_1YWvHdVO_QLi6kVqZSqdMUcya0yJ4qFifZc4R2aodrnLnn_mVDzjBJK1nyz6x_iv7LfX9kRcIdhQRJ6UoT0y9DVDnpo6b4cgu4B38ikiohu-qOcJ22TXQqYs0hgj3TCMvzFOH17dAkgL0Z1XZvGwKJDxBXPP54sRd1k8QyMMTq30kpMLi36yl8hAIIV4RTQBAVhfs6FLTBJidl7Sq3TSQwUwhf3SMNh8UNlL0CsxlKLmt1Q45NaFcFuHXCJoMjIoN_OAe21fBfyY9vrf2KygpJv77r4qRTzIYmw
Details:
Transaction ID: {3419c608-8894-0000-40c7-19349488d201}
Session ID: {3419c608-8894-0000-3fc7-19349488d201}
Published Application Name: Show My Claims (ASP.NET) (Basic)
Published Application ID: 53B426A6-162E-C09B-4D8F-62AAB4E79989
Published Application External URL: https://XXXXXXXXXXXXXXXXXXXXX/YYYYYYYYYY/
Published Backend URL: https://XXXXXXXXXXXXXXXXXXXXX/YYYYYYYYYY/
User: <Unknown>
User-Agent: Mozilla/5.0 (Windows NT 10.0; WOW64) AppleWebKit/537.36 (KHTML, like Gecko) Chrome/56.0.2924.87 Safari/537.36
Device ID: <Not Applicable>
Token State: Invalid
Cookie State: NotFound
Client Request URL: https://XXXXXXXXXXXXXXXXXXXXX/YYYYYYYYYY/?authToken=eyJ0eXAiOiJKV1QiLCJhbGciOiJSUzI1NiIsIng1dCI6InNJZ1Z6ZXVQSkVnVWtkQ1BEa3VsSHF4UVY2USJ9.eyJhdWQiOiJ1cm46QXBwUHJveHk6Y29tIiwiaXNzIjoidXJuOmZlZGVyYXRpb246ZnMuaWFtdGVjLm5sIiwiaWF0IjoxNDg3MjgzNTU5LCJleHAiOjE0ODcyODcxNTksInJlbHlpbmdwYXJ0eXRydXN0aWQiOiI4NmI1OTA2MS0yZTk2LWU1MTEtODBmYy0wMDBjMjkxNDY3NWYiLCJ1cG4iOiJqb3JnZUBpYW10ZWMubmwiLCJjbGllbnRyZXFpZCI6IjM0MTljNjA4LTg4OTQtMDAwMC0zZmM3LTE5MzQ5NDg4ZDIwMSIsImF1dGhtZXRob2QiOiJ1cm46b2FzaXM6bmFtZXM6dGM6U0FNTDoyLjA6YWM6Y2xhc3NlczpQYXNzd29yZFByb3RlY3RlZFRyYW5zcG9ydCIsImF1dGhfdGltZSI6IjIwMTctMDItMTZUMjI6MTk6MTguMTIyWiIsInZlciI6IjEuMCJ9.L_dnLDoEQ6U8ViJ9XWBEMdagj4QsUV4emvtHiX4dik3vos3tWN_1YWvHdVO_QLi6kVqZSqdMUcya0yJ4qFifZc4R2aodrnLnn_mVDzjBJK1nyz6x_iv7LfX9kRcIdhQRJ6UoT0y9DVDnpo6b4cgu4B38ikiohu-qOcJ22TXQqYs0hgj3TCMvzFOH17dAkgL0Z1XZvGwKJDxBXPP54sRd1k8QyMMTq30kpMLi36yl8hAIIV4RTQBAVhfs6FLTBJidl7Sq3TSQwUwhf3SMNh8UNlL0CsxlKLmt1Q45NaFcFuHXCJoMjIoN_OAe21fBfyY9vrf2KygpJv77r4qRTzIYmw&client-request-id=3419c608-8894-0000-3fc7-19349488d201
Backend Request URL: <Not Applicable>
Preauthentication Flow: PreAuthBrowser
Backend Server Authentication Mode:
State Machine State: Idle
Response Code to Client: <Not Applicable>
Response Message to Client: <Not Applicable>
Client Certificate Issuer: <Not Found>
–
When you look up the error in the first line you might find one of the following URLs:
- Web Application Proxy cannot detect the updated certificate after it automatically updates on Windows Server 2012 R2
- Why does Web Application Proxy show the ADFSTokenSigningCertificatePublicKey is “Obsolete”?
- Web Application Proxy Troubleshooting
–
In the beginning, you had to configure the WAP with the primary Token Signing certificate in use by ADFS, with the command:
Set-WebApplicationProxyConfiguration -ADFSTokenSigningCertificatePublicKey MIIFvTCCA6WgAwIBAgITPQAAAL…..
–
After the update http://support.microsoft.com/kb/2935608, you will the “ADFSTokenSigningCertificatePublicKey” property is marked as obsolete. That means you do not have to manually populate the public key of the ADFS Token Signing certificate, but rather WAP will leverage the ADFS metadata to discover the Token Signing certificates in use by ADFS.
Within ADFS you can define multiple Token Signing certificates and one of those certificates is marked as PRIMARY and all others are marked as SECONDARY. As you can see below you can see that my test/demo environment has 3 Token Signing certificates.
Figure 4: List Of Token Signing Certificates In The ADFS Console
–
When you look into the ADFS metadata (URL: /federationmetadata/2007-06/federationmetadata.xml">https://<FQDN ADFS Service>/federationmetadata/2007-06/federationmetadata.xml), you will find all the Token Signing certificates listed in the “IdPSSODescriptor” section (for the role of IdP) and in the “SPSSODescriptor” section (for the role of SP), which have been marked as “use=”signing””. As you can expect and compare it to figure 4 above, you will see (in my case!) 3 “KeyDescriptor”s, one for each Token Signing certificate in use by ADFS. ADFS will always publish all Token Signing certificates in the metadata. no matter if they’re primary or secondary. In addition, ADFS will always publish only the primary Token Encryption certificate in the metadata.
Figure 5: List Of Token Signing Certificates In The ADFS Metadata
–
Using this website you can check the certificates in the metadata and get some output you can understand. You copy the value between “<X509Certificate>…………..</X509Certificate> “ and enter that in the certificate text window.
After doing that 3 times I got (in my case!):
Figure 6: One Of The Token Signing Certificates In Use By ADFS (Marked As Secondary As Shown In Figure 4)
–
Figure 7: One Of The Token Signing Certificates In Use By ADFS (Marked As Secondary As Shown In Figure 4)
–
Figure 8: One Of The Token Signing Certificates In Use By ADFS (Marked As Primary As Shown In Figure 4)
–
As mentioned before, WAP reads the ADFS metadata and picks up the Token Signing certificates in use by ADFS. HOWEVER, it only picks the first 2 occurrences designated as “use=”signing”” as disregards all other occurrences!. Therefore in my case it reads the first and second occurrence (Figure 6 and 7) and ignores the third occurrence (Figure 8). However, when you look in Figure 4 you will see that the certificate listed in Figure 8 is the primary Token Signing certificate that is being actively used by ADFS to sign issued tokens. Because of that WAP can verify the signature of the issued Edge Token and fails with the error as shown in Figure 3.
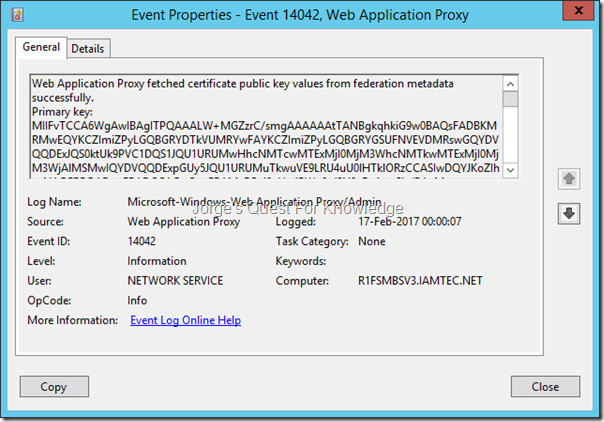
The Figure below show you that WAP will only read the first 2 occurrences of the Token Signing certificates in the ADFS Metadata
Figure 9: WAP Reading The ADFS Metadata And Fetching The First 2 Occurrences Of The Token Signing Certificate
–
Web Application Proxy fetched certificate public key values from federation metadata successfully.
Primary key: MIIDXzCCAkegAwIBAgIQVR5qR+aSho5MH9eWFSXqWDANBgkqhkiG9w0BAQsFADAoMSYwJAYDVQQDDB1UT0tFTi5TSUdOSU5HLlNFTEYuU0lHTkVELk5FVzAeFw0xNjA1MjExMTAyNTFaFw0xODA1MDExMTAyNTFaMCgxJjAkBgNVBAMMHVRPS0VOLlNJR05JTkcuU0VMRi5TSUdORUQuTkVXMIIBIjANBgkqhkiG9w0BAQEFAAOCAQ8AMIIBCgKCAQEAyP5e8em3Y+2Yq57gePRoEjCymWjxozVoVlPn9JuZAQ94KLcVpFDAwJBoD1eNM587hX17WFDUqN6ZM6LMUuPiNSzdugieb+k3kQnTagkJV4vHiwo8qcBHX27DEri/pD81J+6DdiKjrqGVut6+llNP+ab0LXdsuEvoq89eGSNRoUTDHr556CFw4Y+VgwMuXwPVnJoLpj8I9Ml4kItGoBxyAA1RnWNzNBy1GKQ1vIBQxX4/aWAGqBzCs81vrpKhy0HfA/kR9eGoW3GvjJyeSXNkXMfI/5N7SAk11EPopqh6tt1XgjvbyJjiwdE1f79E3mX4ceaz2OQ4H17lYW4jtTZe4QIDAQABo4GEMIGBMB0GA1UdJQQWMBQGCCsGAQUFBwMBBggrBgEFBQcDAjAOBgNVHQ8BAf8EBAMCBaAwMQYDVR0RBCowKIImRE5TIE5hbWU9VE9LRU4uU0lHTklORy5TRUxGLlNJR05FRC5ORVcwHQYDVR0OBBYEFODJ6In6M+5pyaZqU1ygso7MRdBoMA0GCSqGSIb3DQEBCwUAA4IBAQCddGlhNBR+HKWM9kN/EIgH6lc5HYaAzx6zdAiez3X6F/sbGzj0dSAeFrhGGMa/8S4U/lwy01z/FyDPydpoyySnVCStTRYwm1VwRKzen+YwwFWpuSZbdv/TpUm3JfPKzA6Rjaja3M+c7R+2SWZ5/lo5sJwUlhA2O+G4MZOi4F7odxa13XviOCQnnbsTM2JX8Dgue8uMe5M037xDlggeP3vNTXXChtbFTXa+S6NJksOkjL7GSC9VmHJQUPqcqyc8QJH5ynsmPtkr3txrq/HrViSEOynC3klyHOniHNitaW1TK3XHfvLK8tuNI2GL8cFmMP9hzAxANFXPA2FeESiMASJT.
Secondary key: MIIDUTCCAjmgAwIBAgIQc4D9JdgHWYxG5BMq0w06kzANBgkqhkiG9w0BAQsFADAkMSIwIAYDVQQDDBlUT0tFTi5TSUdOSU5HLlNFTEYuU0lHTkVEMB4XDTE1MDkyMTA5MDc0OVoXDTE3MDgyMjA5MDc0OVowJDEiMCAGA1UEAwwZVE9LRU4uU0lHTklORy5TRUxGLlNJR05FRDCCASIwDQYJKoZIhvcNAQEBBQADggEPADCCAQoCggEBAL/KaQ7oQYUF7KZ7cV/PijzuxcgPurRjsoUhFOtZd0wPQz57z8dTWVa2L0Yecuu/qOXvvI5W6XtuRshhQuRpgMZohqw8/y9cVmHrLPVLsyjmSKQtXD8Xd3je+xnY01uMWW6BSB8udbPWaRKG0wnrdpFVRDVlcJKosuLAxCbwXOJbKDX27GAmYGcZSfrlCk/acTGmd7652CZKxNllPwUiX2L5zxJ0BMiEG+xurngsxqzDryrQvMz/ldzwgBZa4wQvnaoevKRTkfp/NfbY34LZxBUMNK7bwbS8dlIrGGeoGSo9q8M9QeIw5URE2CCa8/+UBZuEuorQMWQ9J5nDCzfwK+8CAwEAAaN/MH0wHQYDVR0lBBYwFAYIKwYBBQUHAwEGCCsGAQUFBwMCMA4GA1UdDwEB/wQEAwIFoDAtBgNVHREEJjAkgiJETlMgTmFtZT1UT0tFTi5TSUdOSU5HLlNFTEYuU0lHTkVEMB0GA1UdDgQWBBQ61L+viK+SHtuwZ7OjXrARHQlFHzANBgkqhkiG9w0BAQsFAAOCAQEAr+cI1HlQUlZwxlXZchow3kWPc165qOGqu3xp2B3R1nDrMgTSlBPnIQwLCM9+X9xZ1PaQLRmPLDDOV+0CoimzvHJU+1AjdTnU82gNYBCM3ULQk+HTliilTZL3fcJE+QSOH/03TxGyopfw52v4kITGa5KsZpkemvFUnCEkgWk74D2AqDj9j0zwq5zSoJrC9eIWM8ztl3srmiFrhHmEsPSw8hbe20OdTu1xfmI/UgtnVBL2LwJnXuWpv/GgxSC41SS7F5AS2Y42Ojter6Tk5Vu1OnQwKjkJb6JvoHQcVYQaqSb4ufS1aU6kkC8U1qNAgwmv86Mhhqpf66H05UtMtKo/zg==.
–
Although this is my test/demo environment, what are the lessons learned here?
–
Please make sure to always follow the following guidelines:
- Always have 1 Token Signing certificate and 1 Token Encryption certificate that are configured as primary and valid for some time (at least 2 or 3 years or more)!
- Some time before the Token Signing certificate and/or the Token Encryption certificate are going to expire (e.g. 2 months before expiration) add a new Token Signing certificate and/or Token Encryption certificate (whatever is applicable) and make sure it is marked as secondary.
- To all connected IdPs and connected SPs communicate you will be changing certificates, and where applicable:
- Ask to check if they have updated metadata when consuming the metadata URL of your ADFS
- Mail the metadata XML file containing the current and new certificates or mail the individual certificate files or just mail both
- To all connected IdPs and connected SPs communicate you will be switching the certificates on a specific date
- If the connected system leverages the metadata URL or metadata XML file from your ADFS and it supports 2 Token Signing certificates, the metadata can be updated right away
- If the connected system leverages the metadata URL or metadata XML file from your ADFS and it supports only 1 Token Signing certificate, the metadata should be updated on the specified date
- If the connected system allows the import or configuration of individual certificates and it supports at least 2 Token Signing certificates, the import or configuration of individual certificates can occur right away
- If the connected system allows the import or configuration of individual certificates and it supports only 1 Token Signing certificate, the import or configuration of individual certificates should only occur on the specified date
- Somewhere between 2 and 4 weeks before the certificate expires switch the certificates from primary to secondary and vice versa by configuring the new Token Signing certificate and/or Token Encryption certificate as primary
- After the old Token Signing certificate and/or Token Encryption certificate (the one configured as secondary) have expired remove it from ADFS and remove it from the certificate store on every ADFS server
–
In my case the solution is: remove at least one of the secondary certs. I removed all secondaries! ending with only one as you can see below.
Figure 10: List Of Token Signing Certificates In The ADFS Console
–
On all WAP servers restart the “Web Application Proxy Service” service. You will then see the following event telling you that WAP has fetched the Token Signing certificates from ADFS
Figure 11: WAP Reading The ADFS Metadata And Fetching The First 2 Occurrences Of The Token Signing Certificate
–
Web Application Proxy fetched certificate public key values from federation metadata successfully.
Primary key: MIIFvTCCA6WgAwIBAgITPQAAALW+MGZzrC/smgAAAAAAtTANBgkqhkiG9w0BAQsFADBKMRMwEQYKCZImiZPyLGQBGRYDTkVUMRYwFAYKCZImiZPyLGQBGRYGSUFNVEVDMRswGQYDVQQDExJQS0ktUk9PVC1DQS1JQU1URUMwHhcNMTcwMTExMjI0MjM3WhcNMTkwMTExMjI0MjM3WjAlMSMwIQYDVQQDExpGUy5JQU1URUMuTkwuVE9LRU4uU0lHTklORzCCASIwDQYJKoZIhvcNAQEBBQADggEPADCCAQoCggEBAMvFCaJ9uV+4PWn9x/SN9cDv1uw5iv/PAyM+0KaN9O+Z+bpC8Zg2BKG+niEnhgOL44Ju/HFq8B05ri+FTRuaF++MsbULgNspIAT/YR57O01qdHmp+/U99aAKFQGkLQzYY5H/oSvsf6KkcX/48+GdeYHJIdqaHVHoebDr/jRuFdeF+QNOhPJSa/LdFD0FkZp3E4/UbgJLNkAyI3JMfj/d0ylO/H//+/UGazfeGfCMQ25KilIjVVDypo80I9YMLuqc4SnUVLpbz907P62tL+A6bU4nsSim84zxzZ2OVqr+prCALRnQ1dGtDG1tGqGk2nCcJJrcaK6HhtalQRcypc8RZn8CAwEAAaOCAb8wggG7MD0GCSsGAQQBgjcVBwQwMC4GJisGAQQBgjcVCIPFnQuG8tIrgrWTDIODjlqE/NNggXmH0e1q5JkwAgFkAgEDMBMGA1UdJQQMMAoGCCsGAQUFBwMBMBEGA1UdDwEB/wQHAwUEQDAwMDAbBgkrBgEEAYI3FQoEDjAMMAoGCCsGAQUFBwMBMB0GA1UdDgQWBBRPO9BFXvhThi2Ill1j1IyuQWJVDDAlBgNVHREEHjAcghpGUy5JQU1URUMuTkwuVE9LRU4uU0lHTklORzAfBgNVHSMEGDAWgBSf9NVzUtr9IOSgZRN8SP8W+TbR5zBBBgNVHR8EOjA4MDagNKAyhjBodHRwOi8vY2RwLklBTVRFQy5ORVQvY3JsL1BLSS1ST09ULUNBLUlBTVRFQy5jcmwwgYoGCCsGAQUFBwEBBH4wfDAnBggrBgEFBQcwAYYbaHR0cDovL29jc3AuSUFNVEVDLk5FVC9vY3NwMFEGCCsGAQUFBzAChkVodHRwOi8vY3J0LklBTVRFQy5ORVQvY3J0L1IxRlNSV0RDMS5JQU1URUMuTkVUX1BLSS1ST09ULUNBLUlBTVRFQy5jcnQwDQYJKoZIhvcNAQELBQADggIBAGv392nwZGDgSq7rapUXPdDcoM69a+nsGQhdH59TYwRhHWkgcCZH7la01ZYxky0Kf9ucaAbvBDlIXP088exB44Tqal30N/umZaKpddi1l5qtyJJ2vjNbNSA8wh+iLPpNf6h3uJwGDajoSIeONnuP5imVWlH0MFNhtgcF0nTDrDiST1xzvuquWDG806NEgIZXNx2RKzEi4JHjKnMDYSaPChEF8AtUGKHKd6XfW3vtqD3PUkyTP5wF1uVJ4W7iIb9C7PcR3UlcBzs3mfUOtOUkRiKzGzPCt8agDQ+lKOXshF3vjX0oB7ZJHuGoVI9brKzI0DyxB1JJ75rvIGBIhL/CGUvYwf9tGWUr1UfXykFQGZHSw5gpNesyHlEKjfm/vmwDBDYZpkXr09/ngCJ33HKFYIdvQWZuN8GFmb14HcM5tWV+A5rJMTyAD0+ybisBIt77VZBQU3lQvdAPVeNxYePyECxPRER/Mpwmu8ctxfvkmn7a3CBa9n6G+ZPTeYLKI3vMdjUSQdCRC4/Bgupv1c9Awsf93orjaRVcu1IIfTLUlUykFTieyBzcx5jUGxvlvPNhHDDkRo9fS9eD7m/ypTEIpV2JM/0rjepE0afCva+OAlHic0T4FgZGOTguIwnAQxkVCAig3WflGRuxtqLniYllubrGkJSHQjPLT6R27QtxcxPQ.
Secondary key: <none>.
–
After these actions the application published through the WAP and configured with ADFS pre-authentication was accessible again from the outside!
–
Cheers,
Jorge
———————————————————————————————
* This posting is provided "AS IS" with no warranties and confers no rights!
* Always evaluate/test yourself before using/implementing this!
* DISCLAIMER: https://jorgequestforknowledge.wordpress.com/disclaimer/
———————————————————————————————
############### Jorge’s Quest For Knowledge #############
######### http://JorgeQuestForKnowledge.wordpress.com/ ########
———————————————————————————————


